
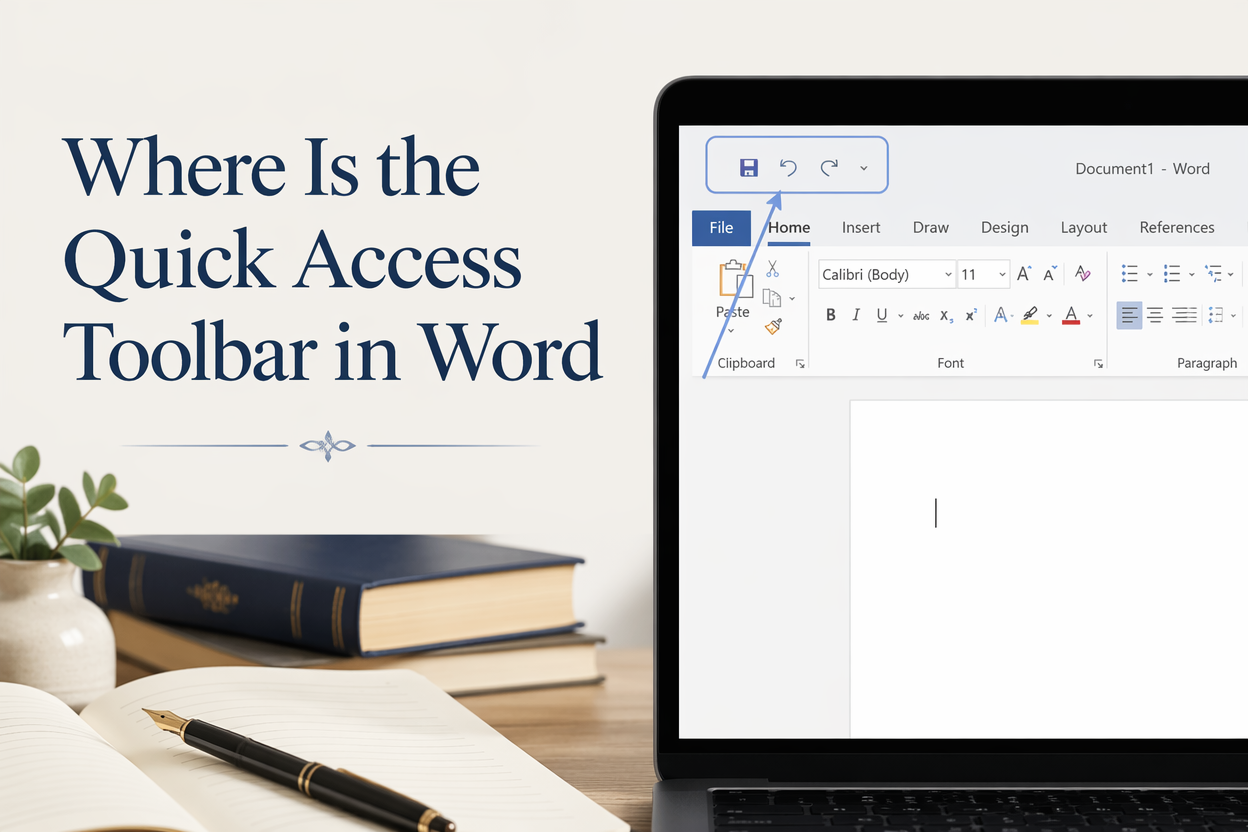
When you are drafting in Word, and you keep thinking, “Where is the Quick Access Toolbar in Word?” you are already losing time you should be spending on sentences. I care about this toolbar for one reason: it is the fastest place to put the few commands you hit a hundred times per writing day, and Word hides it well enough that plenty of authors never set it up.
If you write books, you live in repetition. You apply Styles, you run Spell Check, you toggle Track Changes, you insert comments for your editor, you export PDFs for proofing, and you fix the same formatting glitch for the tenth time. The Quick Access Toolbar, usually called the QAT, turns those repeats into muscle memory.
Here’s exactly where the QAT sits on Windows and Mac, what it looks like when it is hidden, and how to pin the author-specific commands that actually matter. Then, I will tell you the two customization choices that cause the most frustration, so you avoid them.
Table of Contents
Where the Quick Access Toolbar Lives in Word
The QAT lives at the very top of the Word window, above or just below the Ribbon, and appears as a small row of icons, usually including Save and Undo. On most installations, it is in the upper-left corner near the Word icon, and it is so small that it blends into the UI if you are not looking for it.
On Windows, look for a tiny strip of icons to the left of the document name. If you see a down-arrow at the end of that strip, you have found it. On Mac, you may see a similar row near the top-left, depending on your Word version and whether you are using the simplified Ribbon. If you cannot see any small icon strip at all, the toolbar is either moved, minimized, or the Ribbon is configured in a way that makes it easy to miss.
What It Looks Like When It Is Visible
When it is visible, the QAT usually shows three icons by default: Save, Undo, and Redo. It will sit above the Ribbon if Word is in its default layout, and it will sit below the Ribbon if you choose that option. Either way, it never takes up much space, which is why it is so useful for writers.
If you are on a small laptop screen, Word sometimes compresses its header area. The QAT can still be there, but the icons may collapse into fewer visible buttons, so you might need to click the small drop-down arrow to see what is already assigned.
What To Check When It Seems Missing
If you cannot find it, check three things in this order. First, confirm the Ribbon is not fully hidden. If Word is set to auto-hide the Ribbon, the whole top area becomes stingy with space, and the QAT becomes easy to overlook. Microsoft explains the Ribbon display states in their help documentation, including Auto-hide Ribbon and Show Tabs, and that is the first switch I flip when Word looks “empty” at the top. See Show or hide the ribbon in Office.
Second, check whether it has been moved below the Ribbon. That does not remove it, but it changes where your eyes expect it to be. Third, confirm you are in Word itself and not a protected-view document or a strange embedded mode where Word changes the top chrome.
Fast Path To Confirm It Exists
The fastest way to confirm is to right-click anywhere on the Ribbon, on any tab, such as Home or Review. If you see an option that mentions the Quick Access Toolbar, you are in the right neighborhood even if you cannot visually spot it yet. In Word, right-click menus are often more honest than the interface.
How To Show It and Put It Where Your Hands Want It
For authors, the choice of placement is simple. You want the QAT where you do not have to hunt for it. I prefer it below the Ribbon on a tall monitor, because it keeps it closer to the text area and makes the icons feel like part of the page work. On a short laptop screen, I often keep it above the Ribbon, because every vertical pixel counts.
Move It Above or Below the Ribbon
Click the small down-arrow at the far right end of the QAT. If you cannot see that arrow, right-click the Ribbon and select the QAT options. Choose “Show Below the Ribbon” or “Show Above the Ribbon.” The wording can vary slightly by version, but the idea is the same. This small move changes your speed more than you might expect because it reduces the distance your eyes travel.
Once you move it, commit to it for a week. Authors sabotage their own workflow by changing the interface every day and never letting muscle memory form. This muscle memory is the whole point of the toolbar.
Keep It Visible When the Ribbon Is Minimized
If you like working with a minimized Ribbon, the QAT becomes your lifeline because it stays available when tabs collapse. If you are drafting a chapter and you do not want Word to distract you with formatting options, minimize the Ribbon and let your QAT hold the few tools you still need.
Microsoft documents the minimize behavior and related display options on its Office support pages, which is useful for understanding the mode you are in when the top of Word keeps changing shape. Use Microsoft’s ribbon display instructions as your reference if your UI looks different from a screenshot in the tutorial.
My Author Setup for the Quick Access Toolbar
The QAT is most valuable when it contains commands that save you from tab-hopping. As a book writer, you do not need thirty icons. You need the handful that remove friction from drafting, revision, and formatting for submission or publication.
I keep different QAT sets for different phases. When I draft, I care about navigation, comments, and styles. When I revise, I care about Track Changes, Find, and the next comment. When I format for distribution or for an editor, I care about the Styles pane, Paragraph marks, and PDF export. You can do the same without overcomplicating it.
Commands I Recommend for Drafting
For drafting, add these first, in this order. Put the most-used commands closest to the left, because your cursor travel and your glance travel matter.
- Undo and Redo, if they are not already there.
- Save or AutoSave toggle, depending on your Word setup.
- Styles Pane, because authors who apply headings and body style consistently suffer less when they later export to an ebook or hand a manuscript to a formatter.
- Navigation Pane, especially for long nonfiction or any novel with scene breaks, because scrolling is a tax you pay forever.
- Find or Advanced Find, for targeted fixes like double spaces, em dashes, or repeated words.
If you write in Word and you are not using Styles, you are signing up for painful formatting later. The QAT is a good place to put the Styles Pane so you cannot pretend you forgot it exists.
Commands I Recommend for Revision and Editing
Revision is where Word can either feel professional or feel like a maze. Add:
- Track Changes toggle, because you will forget it at the worst moment.
- New Comment, for leaving yourself notes like “tighten this paragraph” or “check timeline” without derailing the draft.
- Next Comment and Previous Comment, so that you can process edits like a checklist.
- Accept Change and Reject Change, if you are doing line-level work with an editor.
- Spelling and Grammar, used deliberately, not compulsively.
For indie authors, this set matters because revision time is where budgets get real. Every minute you save navigating tools is a minute you can spend on what readers actually notice: clarity, pacing, and voice.
Commands I Recommend for Formatting and Publishing Handoffs
When you are preparing a manuscript for an editor, a proofreader, or a formatter, the QAT should help you spot and control invisible formatting. Add:
- Show All or Paragraph Marks, so that you can see extra spaces, manual line breaks, and other gremlins.
- Page Break, when you are structuring front matter and back matter.
- Print Preview and Print, if you still do paper proof passes.
- Export or Create PDF, because PDF proofs are standard for many editors and cover designers.
If you publish through Amazon KDP, clean formatting supports your paperback conversion and ebook conversion when you export and hand off a file for conversion. Word itself is not the final publishing format, but it is where most messes start or get prevented.
How To Add and Remove QAT Commands Without Fighting Word
Adding commands is easy when you do it as soon as you need them. That habit matters. Authors tend to wait until their workflow is already frustrating, then they customize out of annoyance and overstuff the toolbar.
Add A Command From the Ribbon
Find the command on any Ribbon tab, then right-click it and choose “Add to Quick Access Toolbar.” This method is fast because you do it while you are already thinking about the task. If you do not see the command you want on the Ribbon, you can still add it through the customization panel, which holds the more advanced options.
Add Commands Through Word Options
On Windows, go to File > Options > Quick Access Toolbar. On Mac, go to Word, then Preferences, then Ribbon and Toolbar, depending on your version. You will see a list of commands and a list of what is currently on your QAT. Add what you want, remove what you never touch, and keep the list short enough that your eyes land on the right icon without scanning.
Microsoft documents QAT customization and the menu path in their support article, which is useful when your Word version labels the menus slightly differently.
Use Keyboard Shortcuts Alongside the QAT
The QAT is not a replacement for shortcuts. It is a bridge between habits. I use shortcuts for the commands I hit every few seconds, like Save and Undo. I use the QAT for commands I need frequently but not constantly, like Styles Pane, Track Changes, and Paragraph Marks. If you put everything on the QAT, you are treating the symptom, not the cause.
Word even assigns Alt-based access keys to the QAT on Windows. That means you can press Alt and then a number to trigger the command, depending on its position. If you want a citation for the principle rather than my preference, Microsoft describes how the QAT interacts with keyboard access in their Office help on customization and access, including QAT behavior. Start with Microsoft’s QAT customization reference and explore the keyboard access notes for your platform.
Troubleshooting When the QAT Acts Weird
When authors tell me their QAT is “gone” or “broken,” it is usually one of a few predictable problems. The fix is rarely dramatic, but it can be annoying if you do not know where Word stores settings.
QAT Missing After an Update or New Computer
Word settings can reset after major updates, and they can differ between installations even when you sign in with the same Microsoft account. If your QAT disappears on a new machine, go straight to the customization panel and check whether you are editing the QAT for “All Documents” or for a specific template. Many writers accidentally customize a template and then wonder why their toolbar does not carry over to other files.
If you care about consistency, base your book manuscripts on a single template and keep your QAT tied to all documents, not a one-off file. This step prevents you from having one toolbar for Book 1, another for Book 2, and a third for the random short story you wrote at 2 a.m.
Commands Greyed Out When You Need Them
Some QAT commands are context-sensitive. If your cursor is not in the right place, the command will appear disabled. This behavior is common with table tools, certain review features, and some export functions. When a command is greyed out, click into the document body, select the text the command acts on, and try again.
If Track Changes is disabled in a shared file, your editor may have locked it, or the document may be protected. Check Restrict Editing settings and document protection if you are working in a production environment.
QAT Too Crowded To Be Useful
A crowded QAT is slower than the Ribbon because you have to parse icons visually. Keep it to eight to twelve commands, max, unless you have a very specific accessibility reason. Anything beyond that belongs on the Ribbon or in a macro.
If you want to go further, consider creating a macro for repetitive cleanup tasks, such as replacing double spaces, fixing straight quotes in a draft, or applying a standard scene break style. If you build author tools, this is the same idea Adazing uses in software like QuickWrite: remove repeated friction so your attention stays on the story rather than the interface.
FAQs for Where is the Quick Access Toolbar in Word
Can I show the Quick Access Toolbar below the Ribbon?
Yes. Click the drop-down arrow on the Quick Access Toolbar and choose “Show Below the Ribbon.” If you do not see the arrow, right-click any Ribbon tab and look for the Quick Access Toolbar options there. I like below-the-Ribbon placement when I am revising, because it keeps the tools closer to the manuscript area.
Why did my Quick Access Toolbar disappear in Word?
The common causes are a hidden or auto-hidden Ribbon, a UI mode change after an update, or a toolbar customized for a specific template rather than for all documents. Start by checking Ribbon display options, then open Word’s Quick Access Toolbar customization panel to confirm the toolbar is enabled and assigned to the scope you expect. Microsoft covers the relevant settings in their Ribbon display help and their QAT customization article.
What should I put on the Quick Access Toolbar for writing a book?
Put the commands you reach for constantly during drafting and revision: Styles Pane, Navigation Pane, Track Changes, New Comment, Next Comment, Paragraph Marks, and a Find tool. Keep the list short enough that you can hit the right button without having to look hard. If a command is rare, leave it on the Ribbon and protect your QAT for the moves you repeat every day.
The Practical Payoff for Authors
The QAT is a small feature, but it shapes your writing day by removing hundreds of tiny interruptions. Find it, place it where your eyes naturally land, and load it with the commands that match your current phase: drafting, revision, or formatting. Your job is to keep your attention on the book, and Word works better when you force it to stop hiding the tools you use the most.
