
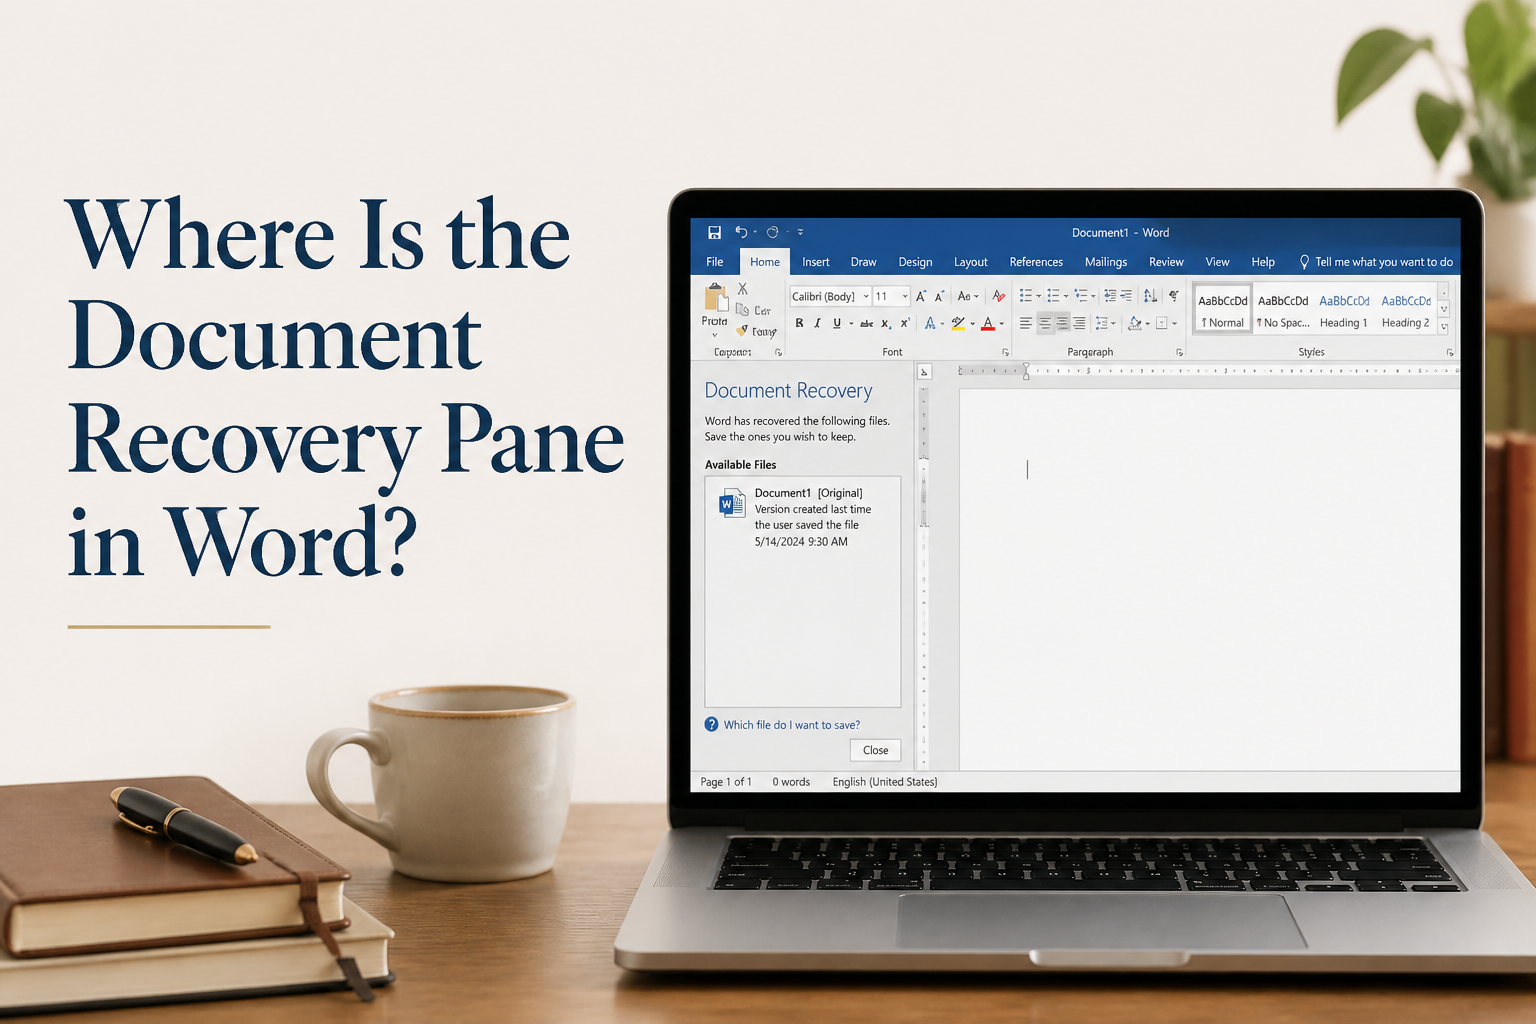
Where is the Document Recovery Pane in Word? It usually appears automatically on the left side of your screen after Word crashes or after you force-close it, and that timing is exactly why authors miss it. You reopen your manuscript, your pulse is up, and you start clicking around the ribbon like your book is bleeding out on the table. The pane is not a normal menu item you browse to; it is a post-crash rescue interface that appears when Word detects unsaved or autosaved versions.
If you are drafting a novel, revising a nonfiction manuscript, or formatting a paperback interior, this pane matters because it is often the difference between losing 2 minutes and losing two hours. Word can recover multiple versions of the same file, and the best one is rarely the one you reflexively open first.
Let me tell you where it appears, how to recover files even when the pane doesn’t appear, and how to set up your writing workflow, so Word has less power to ruin your day.
Table of Contents
Where the Document Recovery Pane Appears and Why You Do Not See It
The Document Recovery Pane appears after Word restarts following an unexpected shutdown. You will see it on the left side of the Word window with a list of recovered files, usually labeled with timestamps and phrases such as “Recovered” or “Autosaved.” Microsoft describes this behavior in its support docs on recovering your documents and data, including what to do with the files once you see them.
If Word closes cleanly, you often will not get the pane. That includes cases where you close Word yourself, your computer shuts down normally, or Word thinks it exited without a crash even though your last edits never made it to disk. Authors run into this when they are writing on a laptop that sleeps aggressively, when OneDrive sync stalls, or when they are bouncing between Scrivener, Word, and a browser full of research tabs.
What It Looks Like When It Does Appear
On Windows, the pane typically docks on the left with a title like “Document Recovery” and a list of files. On Mac, the experience is less consistent. You may see an “AutoRecovery” prompt or a dialog offering recovered versions, but the classic left-side pane is more strongly associated with Word for Windows.
Each recovered entry has a timestamp. Some entries represent AutoRecover snapshots. Others represent the last saved version. Word may also show multiple entries for the same manuscript if it captured several snapshots during the session.
Why The Pane Fails to Show Up
Three common reasons explain most missing panes.
First, Word did not consider the exit a crash, so it never triggered recovery. Second, AutoRecover was turned off or set to a long interval, so there is nothing useful to show. Third, the recovered files exist, but Word cannot surface them in the UI because the temp or AutoRecover folder got cleaned or redirected.
Do not waste time hunting for a hidden checkbox labeled “Document Recovery Pane”. Your control is in AutoRecover settings and manual recovery tools.

Finding Your Recovered Draft When the Pane Never Shows Up
If the pane does not appear, you can still get to the same recovered material. For authors, this is the move that saves chapters.
In Word on Windows, go to File, then Info, then Manage Document. You will usually see options such as “Recover Unsaved Documents” or “Recover Unsaved Files.” This opens the UnsavedFiles folder where Word stores temporary recovery copies.
Microsoft documents this path and the underlying recovery behavior in its guide on recovering an unsaved Word document.
Windows Path That Often Holds Unsaved Documents
If you need the folder directly, Word commonly uses a path like this on Windows:
C:Users<YourName>AppDataLocalMicrosoftOfficeUnsavedFiles
Recovered AutoRecover files may also appear as .asd files in AutoRecover locations. If you see .asd files, open Word first, then use File > Open > Browse, and change the file type dropdown to “All Files” so you can select the .asd file.
Mac Locations and What to Search For
On Mac, the simplest approach is often Spotlight search for “AutoRecovery save of” followed by the document name. Word for Mac stores AutoRecovery files in a hidden Library path. Apple explains how to access the Library folder on your Mac if you need to browse manually.
If you are working in a cloud-synced folder such as OneDrive, check the cloud recycle bin and the local trash. Sync conflicts can create duplicated versions that look wrong until you open them.
When You Should Use Version History Instead
If your manuscript lives in OneDrive or SharePoint, you may have Version History available, which can be cleaner than dealing with temp files. In Word, File, Info often shows Version History. Pick the version with the timestamp that matches your last known good writing session. This approach saves you from accidentally committing an incomplete recovery file over your real draft.
Using the Pane Without Losing the Best Version of Your Manuscript
The Document Recovery Pane can hand you three versions of the same chapter, and only one of them has the line you need. Treat it like a triage board. Your job is to identify the most complete version, preserve it, and only then replace your working manuscript.
Open Each Recovered File, Then Save As Immediately
When you click a recovered file, Word opens it in a normal editing window. Before you edit anything, do a Save As to a new filename. I recommend a naming pattern that keeps you from overwriting a good file with a worse one, like:
MyNovel_Recovery_2026-07-13_1042.docx
This step matters because Word may delete recovery items after you close them or after you tell it you do not need them.
Compare Versions Like an Editor, Not Like a Panicked Writer
If you have more than one recovered copy, open two versions and compare them. Word has a built-in Compare feature under the Review tab. It is not perfect for manuscripts, but it can quickly show you what is missing in one file and present in another. If you are a heavy reviser, this feature prevents the classic mistake of keeping the file with the latest timestamp even though it has less content.
When your draft includes tracked changes, comments, or lots of formatting, comparisons can get noisy. In that case, focus on the last few pages you wrote and verify the ending of the document. Most losses happen at the tail end of the session.
Closing Recovered Files Without Deleting Them
When the pane is present, you may see options like “Save” or “Close” next to each entry. If you close an entry without saving, Word may treat it as disposable. Save first, close second, then confirm the saved file opens normally.
If Word asks whether you want to keep the recovered versions, keep them until you have checked your manuscript from start to finish, or at least through the section you wrote during the lost session.
AutoRecover and AutoSave Settings That Actually Protect Authors
Authors often assume Word is “saving in the background”. That is only true when AutoSave is enabled for cloud files, and even then it can fail quietly if you are offline or if sync is stuck. AutoRecover is a separate feature that saves recovery information on a timer. You want both working for you, with settings that match the way authors write.
Set AutoRecover to a Short Interval
For drafting, I like AutoRecover at 1 to 5 minutes. If you are on a slow machine or a giant file with images, 5 minutes may feel safer. You can change this in Word Options under Save, then “Save AutoRecover information every X minutes.” Microsoft covers the setting and how it behaves in its documentation on adjusting AutoRecover frequency.
Longer intervals make sense for light office documents. They punish writers who draft in long, uninterrupted bursts. Ten minutes can be 800 words on a good day.
Understand the Difference Between AutoSave and AutoRecover
AutoSave is the live saving toggle you see at the top left in newer versions of Word. It generally works when your file is stored in OneDrive or SharePoint. AutoRecover works even for local files, but it creates recovery data that you may still need to retrieve after a crash. If you write in local folders, AutoRecover is your lifeline. If you write in OneDrive, AutoSave plus Version History often does the heavy lifting.
If you are formatting a print interior in Word with lots of section breaks and styles, I suggest saving manually at major milestones anyway. Word can do strange things when a file gets complex, and a manual save point gives you a reliable checkpoint.
Stop Writing in a Single Massive File When You Are in Heavy Revision
This practice is not about Word being bad. It is about risk management. A 120,000-word novel in one .docx with tracked changes, comments, and images is harder to recover cleanly than a manuscript broken into parts. When editing long books, I often split them into separate files by act or section during intensive revision, then combine later for final formatting.
If you prefer one file for drafting, keep it. When you shift into heavy line edits or layout work, consider working in smaller chunks. That choice reduces the risk of file damage and speeds up recovery if something goes wrong.
A Writer-Proof Recovery Workflow for the Next Time Word Misbehaves
Word recovery is a safety net, not a plan. Your plan should assume that your laptop will crash the night before your deadline and that your cloud sync will fail at that moment. You do not need paranoia. You need a boring routine.
Use a Simple Versioning Habit
At the start of each writing day, save a new version with a date stamp. At the end of any major revision session, save another. This approach gives you clean rollback points without depending on Word recovery artifacts.
If you publish frequently, this habit pays off beyond recovery. It also helps when you need to undo a structural change that looked smart at 11 p.m. and reads like a mistake at 7 a.m.
Keep Your Draft and Your Production File Separate
I see authors draft in the same Word file they later turn into a paperback interior, complete with page numbers, headers, and dozens of section breaks. That file becomes fragile. Draft in a clean manuscript file. Then duplicate it and treat the duplicate as your production file for formatting and final proof.
This separation also makes your beta and ARC process cleaner. You send a stable draft to readers, then you do production work without threading layout changes through ongoing edits.
Use Tools That Reduce the Odds You Need Word Recovery
If Word is your primary drafting tool, you can still build redundancy around it. Keep your manuscript in OneDrive for AutoSave and Version History, or back up the folder to an external drive. If you write in a focused drafting app and export to Word later, Word carries the full load less frequently.
At Adazing, I build and use tools for authors across the whole pipeline, from drafting to publishing to marketing. I like having a dedicated writing environment when I am drafting, then switching to Word when I need Word’s strengths, like styles, Track Changes, and print layout control. Your goal is fewer points of failure, not a heroic ability to recover after the failure.
FAQs for Where is the Document Recovery Pane in Word?
Can I open the Document Recovery Pane manually in Word?
Word does not offer a reliable “open the pane” button, since a crash-recovery state is what triggers it in the first place. When it does not appear, use File > Info > Manage Document, then “Recover Unsaved Documents” to reach the same recovered material.
Why did Word recover an older version of my manuscript?
AutoRecover saves on an interval, so the newest recovered file may still be behind your last typing burst. If AutoSave was off and you did not manually save, Word may only have the last AutoRecover snapshot. Reduce the AutoRecover interval and keep manual versioned saves for long sessions.
Is a recovered file safe to overwrite my main draft?
Not until you verify it. Open the recovered file, Save As under a new name, then check the end of the document and any sections you edited most. Only after that should you replace your main draft, and even then I keep the old file for a few days in case I need to pull a paragraph back.
The Real Fix for Losing Pages to a Crash
The Document Recovery Pane is a useful rescue tool. However, it is not the foundation you want for your writing life. Set AutoRecover to a short interval, write in files and workflows that stay stable under revision pressure, and keep simple dated versions so you can roll back without drama. You will still have the occasional Word tantrum, but it will cost you minutes, not chapters.
